SocialGrid Updated to Version 1.0.0.7

We just updated our MP Stacks + SocialGrid Add-On to version 1.0.0.7. This update moved the YouTube Comments from Google “Old” way of fetching the comments to their “new” way – also known as Version 3 of their API (for the techies in the room).

YouTube comments will be broken if you have an old version because of this so update as soon as you can by logging into your WordPress dashboard and clicking on “Dashboard” > “Updates”. You can do the update directly there.

Let us know if you have any trouble getting the update by emailing us at support@mintplugins.com and we’ll be glad to help you out!

WordPress 4.3 is available!

WordPress just released version 4.3. You can easily update by logging into your WordPress and clicking on “Updates” under the “Dashboard” tab on the top left side of your dashboard screen. We’re happy to say that all of our plugins and themes are fully compatible with this update – just make sure all of your plugins and themes get updates when you do the WordPress update as well.

One of the main features in the new version of WordPress is the “Favicon” That’s the little icon that appears in your browser tabs. You can easily upload your favicon (or “Site Icon” as WordPress is calling it) by going to “Appearance” > “Customize ” > “Site Identity”. Additionally, changing your “menu” is done in the “Customizer” as well now. There has been some controversy about whether this is the best way of changing menus in WordPress – but for now, that’s the new way of doing it. (Previously this was done by going to your dashboard and then “Appearance” > “Menus”).

A lot of users wonder why updates need to happen so often – and whether or not they should be doing them. The short answer is that you should always do your updates because they help to keep your website secure – as hackers are always inventing new ways of “getting in”, and WordPress is constantly beating them 🙂 If you don’t do the update, you could be exposing your site to those hackers.

Sometimes, with “big” updates like the one WordPress just released, you may want to wait a couple of days before updating to make sure that any “bugs” get worked out and found by the “more brave” website owners among us – but don’t wait too much longer than a couple of days or you risk exposing your website.

Another thing you need to make sure of is that all of your plugins stay up to date as well. Sometimes, if updating plugins/WordPress/themes has broken your website in the past, you might be wary of doing it again. But even still, you should do your best to make sure you keep everything up to date. If an update “breaks” your website, contact the author of that plugin immediately to let them know. Most good plugin authors will respond very quickly – and if they don’t respond at all, it’s likely best to stop using that plugin because the author isn’t actively supporting it.

If you are particularly web-savvy, having a “staging” version of your website set up is a good idea to test updates before they come out. A staging site is basically an exact duplicate of your website that exists purely for testing updates and changes. If your website is growing or has a lot of users and you can’t afford to be down for even a few hours, it’s a good idea to look at setting up a staging version of your website.

If you have any questions or comments about updates, let us know in the comments below – or drop us a line by emailing support@mintplugins.com. We’ll get back to you very quickly – as helping our customers is one of our favourite things to do!

Give your site a fighting chance with Analytics

I’m always shocked when people tell me they don’t have Google Analytics tracking on their website. Speaking from experience, it is really important to know why people are coming to your website. Analytics help you “steer” your business in the right direction. Many websites start with a goal to do “Thing A”, struggle for a year, and then find they are actually getting traffic to their website for “Thing B” – which might have even just been a single blog post about a random/different topic.

[bctt tweet=”Knowing why people are visiting your website allows you to adapt – and it is essential to your online success.”]

Once you find out that 99% of people are coming to your website for 1 single blog post (as I did with one of my websites), you’ll realize that blogging about that particular topic is probably a good idea. You’ve probably just found your “niche” – and you might have missed it all together without setting up some simple analytics tracking.

Step 1 is to sign up for Google Analytics: http://www.google.com/analytics/

Step 2 is to install a Google Analytics plugin on your website. I recommend the free “Google Analyticator” plugin here:
https://wordpress.org/plugins/google-analyticator/

This way you know exactly why people are coming to your website and your chances of online success will grow by leaps and bounds!

*If you notice that you are getting a lot of weird websites listed in your Analytics as “referrers”, read our next post about eliminating pesky Analytics Spammers here.


How to eliminate pesky Analytics Spammers

Note: Our “Master List” of Spam websites-to-block is at the bottom of this post.

If you’ve set up Google Analytics on your website, you might have noticed some weird websites being listed as “referrers”. There’s a new, pretty annoying spammer trick out there now where the spammer will send fake “visits” to your website from their own website. This makes their website “rise the ranks” on your analytics list of referrers, and it makes you – the site owner – go and check out there website. Pretty sneaky huh?

That’s only half of the annoying part. The main problem is that now you don’t actually know who is linking to you! This can be a major problem – but there is a pretty simple way to fix it. You can tell Google Analytics to “block” referrals from specific websites and it really easy to do.

Step 1:

Go go https://google.com/analytics/web/ and log in.

Step 2:

Make sure you are on the “Admin” tab at the top of the page.

admin-tab-google-analytics

Step 3:

In the middle “properties” column, click on “Tracking Info” > “Referral Exclusion List”.

referral-exclusion-list

Step 5:

Click the “+ ADD REFERRAL EXCLUSION” button and type in all the domains that you want to block.

Tip: When you are entering a domain to block, you can adda “star” or “asterisk” (*) before the domain to also block any subdomains from that site. For example: site35.website.com, site36.website.com etc. (Website spammers are actually doing this and it could take you a long time to enter each subdomain individually – so this will save some time).

The “Master Spammer List”:

Because there are so many of these spammers popping up, we are going to keep a master list of all the spammy websites here so you can easily add the entire list to your website – instead of fighting with each one for months – only to find another has popped up. If you find a spammer domain on your website’s analytics that isn’t on this list – please let us know in the comments below and we’ll make sure to add it. This way we can all work together to eliminate every last one of these annoying spammers and get back to working on our websites!

Block These Sites:

  • semalt.com
  • *.semalt.com
  • simple-share-buttons.com
  • *.simple-share-buttons.com
  • aliexpress.com
  • *.aliexpress.com
  • googlsucks.com
  • *.googlsucks.com
  • buttons-for-your-website.com
  • *.buttons-for-your-website.com
  • theguardlan.com
  • *.theguardlan.com
  • myftpupload.com
  • *.myftpupload.com
  • best-seo-offer.com
  • *.best-seo-offer.com
  • 4webmasters.org
  • *.4webmasters.org
  • social-buttons.com
  • *.social-buttons.com
  • hulfingtonpost.com
  • *.hulfingtonpost.com
  • hol.es
  • *hol.es
  • Get-Free-Traffic-Now.com
  • *.Get-Free-Traffic-Now.com
  • buy-cheap-online.info
  • *.buy-cheap-online.info
  • free-share-buttons.com
  • *.free-share-buttons.com

Blocking the bots (advanced)

Ideally, we’d prevent these bots from accessing our site AT ALL as they are draining resources needlessly. There are ways to block them entirely using htaccess (if you use apache) and in your sites-available file (if you use nginx). I won’t get into that in this blog post – but there are a lot of great resources out there for blocking evil bots altogether.

Here’s a link for Apache (htaccess): http://www.marketingpilgrim.com/2014/08/tips-for-blocking-semalt-and-botnet-attacks.html

Here’s a link for NGINX: http://www.mkyong.com/nginx/nginx-block-referrer-spam/

Because I use NGINX for all my web servers I will add my code for how I block these spammers from my server altogether. In the “nginx/sites-available/mywebsite.com” file, under “location / {” I add the following if statement which blocks most spammers:

if ($http_referer ~* (seo|babes|click|girl|jewelry|love|organic|poker|porn|sex|teen|video|webcam|semalt|simple-share-buttons|aliexpress.com|googlsucks|buttons-for-your-website|theguardlan|myftpupload|4webmasters|social-buttons|hulfingtonpost|hol.es|free-share-buttons.com|www.Get-Free-Traffic-Now.com) ) {
return 405;
}

Have more sites to add to this list? Help everyone out and let us know in the comments below.

How to trade a song (or file) for an email address!

how-to-trade-an-email-for-a-songGetting people to sign up for your mailing list is imperative to your online growth – whether you are a musician, artist, or business. Social Media accounts like Twitter, Instagram, and Facebook are also very important. But don’t overlook the incredible value that an email list can have – especially when the people on your email list WANT to get emails from you.

In this post, I’m going to show you a quick and easy way to set up an email sign-up form (using MailChimp.com) which will trade a file download (song, zip file, video, or even just a URL to a secret video) for a user joining your email list.

We’re also going to use the “Double Opt-In” feature with MailChimp so we KNOW that people really want to hear from us – and then we don’t have to feel like spammers when we send out emails 🙂

Following these steps should take you about an hour:

Step 1.

Get a free MailChimp account by signing up at https://mailchimp.com

Step 2.

Buy our MP Stacks + Mailchimp plugin for $5 here. Once you’ve purchased the plugin, download it and then install it on your WordPress on the “Plugins” > “Add New” > “Upload” page in your Dashboard.

Step 3.

Choose the page you want to place the email sign-up on. Maybe this is your home page, or maybe your footer. Edit that page by going to “Pages” in your WordPress Dashboard.

Step 4.

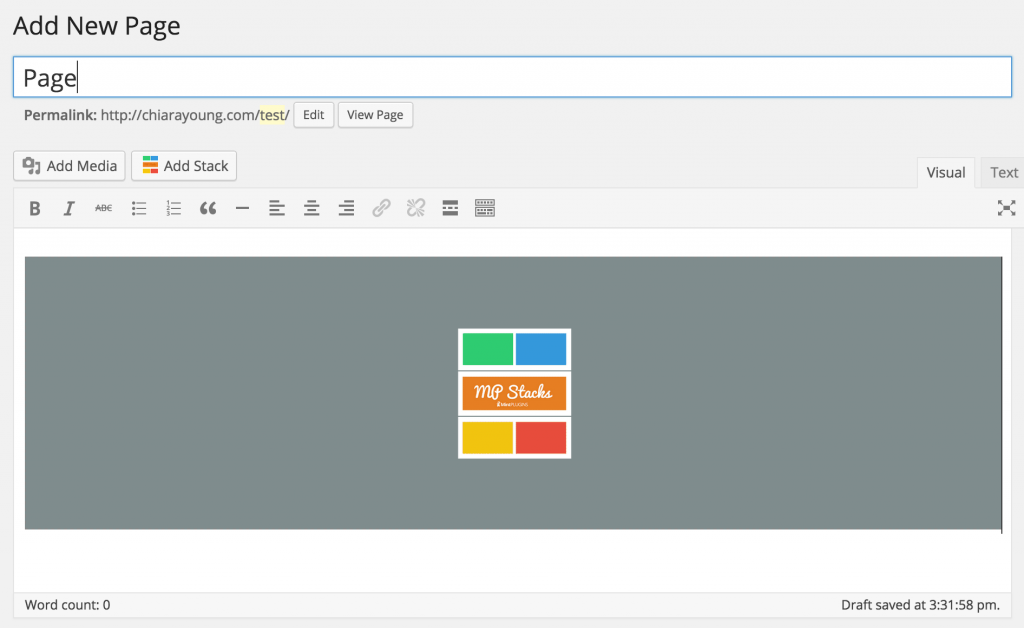
Make a new Stack by clicking on the “Add Stack” button above the text area on the page editor. The button looks like this:

add-stack-button

If you’ve already added a Stack to your page you can, of course, skip step 4.

Step 5.

Once you’ve added a new Stack to the page, view the page by clicking “View Page” at the top of your screen.

Stack-on-page

Step 6.

For new Stacks click “Add a Brick to this Stack”. It will look like this:
blank-stack

If you have already created Bricks in this Stack, open the Brick Editor by clicking “Edit Brick.

Step 7.

In the Brick Editor, which is now open on your screen, under “First Content-Type”, choose “MailChimp”.

Step 8.

You will now see some options for your MailChimp information. Click “Find Your MailChimp API Key Hereto quickly locate your API Key (Make sure you are logged into MailChimp). Then paste the key into the Brick Editor.

Step 9.

Create a “List” in MailChimp. You can do this by going to MailChimp and logging in. Then at the top click on “Lists” > “Create List”. Call the list something like “Song/File Name X Download”. You want the name of this list to correspond with the action the user is taking so they understand.

Step 10.

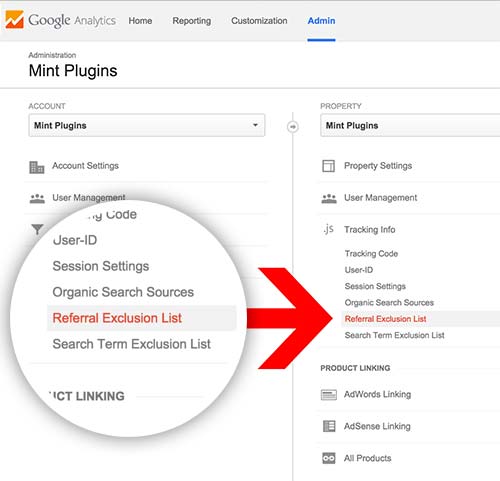
Locate the list ID. The list ID is easy to locate. Go to “Lists” > Select your list > “Settings” > “List Name and Defaults”. It looks like this:
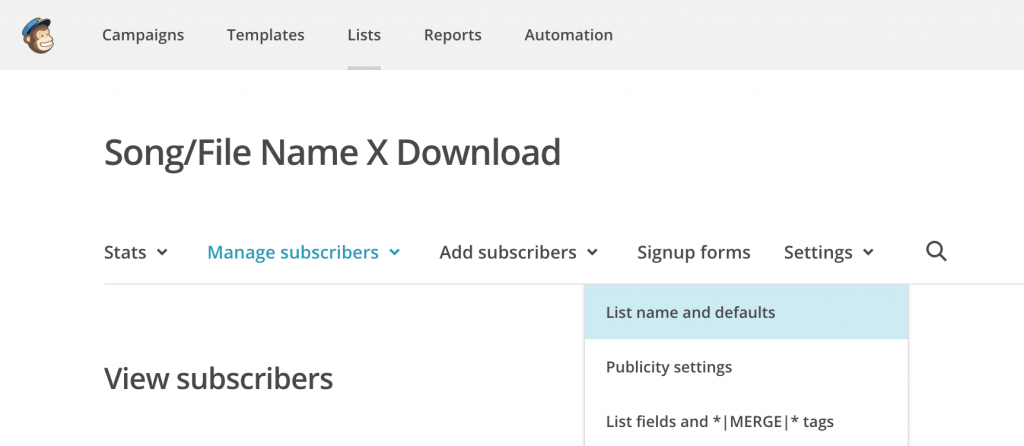
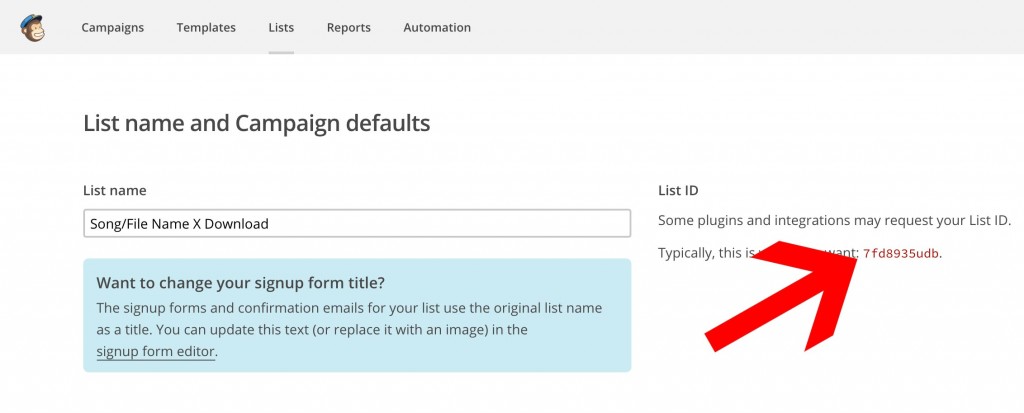
Mailchimp-list-id

List-id-mailchimp

Step 11.

Copy the List ID and paste it into the Brick Editor. You can also start to design the Brick the way you’d like by adding a Background Image/Color under the “Background Settings” on the top right. When you are ready, click “Update/Publish” on the very top right side of the Brick Editor.

Step 12.

Create a new Page in WordPress by going to “Pages” > “Add New”. This page will be a “secret” page that your new subscribers will be automatically sent to when they sign up. It is on this page where we’ll “give” them the Song/File. Call the page something like “Thanks for Subscribing!”. You can then click the “Add Stack” button to place a new Stack on this Page.

Step 13.

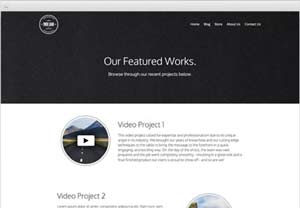
View the page you created in Step 12 by clicking the “View Page” button at the top of the page and then Add a new Brick to the Stack. In this brick, under “Content-Type 1”, we’ll choose “Text”. In the text area we’ll write something like “Thanks for Subscribing. Here’s is your file download”. Then, we’ll click “Add Another” at the bottom of the text area to add another Text Area. In that area, we’ll upload the file we want to give the user and insert it into the text area using the “Add Media” button just above the text area. When we’re done all that, click the “Update button at the top right of the Brick Editor.

Here’s a sample of the “Thanks for Subscribing” page I made in 2 minutes with MP Stacks:

Here's a sample of the "Thanks for Subscribing" page I made in 2 minutes with MP Stacks

Step 14.

Now we have the “Secret” page which will deliver the file to the new subscribers – but how do the new subscribers get here? It’s pretty simple. Go back to your MailChimp dashboard and select the List we have been using by clicking on “Lists” at the top of the page and then selecting our list. Now, click on “Signup Forms” > “General Forms”. Find the form called “Confirmation ‘Thank You’ Page”. It looks like this:

Mail-chimp-edit-confirmationpage

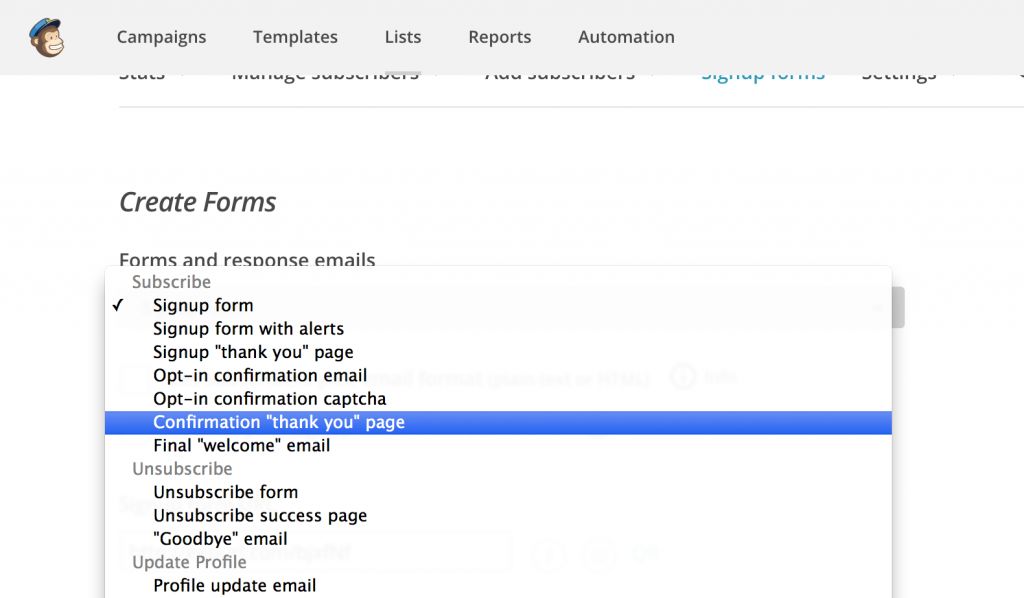
Once we click on that, you’ll see an option that says: “Instead of showing this thank you page, send subscribers to another URL”. In that field, copy/paste the URL of the page we created in Step 12.

Step 15 (Optional & Advanced).

At this point everything is done and working! Congratulations on a job well done.

Now, if you are slightly more advanced and want to block Google from “indexing” your secret page (from Step 12), open your FTP and go to your WordPress’s root directory (the place where the wp-content, wp-admin, and wp-includes directories sit). In here we need to create/modify the “robots.txt” file to tell Google (and other search engines) that we don’t want our secret page to be indexed. If the “robots.txt file exists there, open it for editing. If it doesn’t exist, make a new file and call it “robots.txt” and open it.

Now locate the “slug” of your secret page by going to “Pages” > your secret page. The slug is located just beneath the Page Title field and looks like this:

page-slug-wordpress

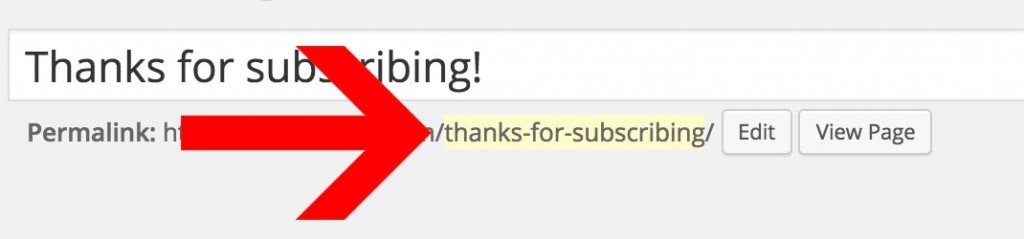
In that robots.txt file we need to add this line:

Disallow: /thanks-for-subscribing/

Then save that file in your WordPress root directory and Google won’t index our secret page.


And there you have it! This has been a great way for both myself, customers, and friends to grow their email lists.


Why You Still Need A Website in 2015

really-need-a-website-in-2015With the advent of social media (almost 10 years ago now), websites have become a little bit of an afterthought – after making sure to keep your Facebook, Twitter, Instagram, Snapchat and other social media profiles updated. And without a doubt, this is great practice. But, websites are just as important in 2015 as they ever have been – if not more-so. Here are a few reasons why:

Reason 1: Professionalism.

While having active social media accounts is an awesome online strategy for getting your business “out there”, having a great-looking and functional website behind it all really makes your brand stand out as being professional, “here to stay”, and not just interested in the latest fads and trends.

Reason 2: Consistency.

Your website is a place where information about your company lives – and can be quickly accessed by anyone looking to learn about who you are. Too often, business and brands rely on a single paragraph in an “about us” section on Facebook – leaving new customers scratching their heads about what exactly it is that you do. If all you have are Facebook status updates, new customers looking to learn about you will have to scroll through months of status updates just to get a feel for your company/brand. A well polished website is a much stronger way to leave a lasting impact in their minds – while directing them to your social media FROM your website is a great way to keep them engaged day to day.

Reason 3: Control for the long run.

This might be the most important reason of all. If a social media site decides to change up its business model, they could delete your content, or even remove your entire profile if they so choose – if you were seen as a competitor or as breaching their terms in some way. At the end of the day, they own the content on their website – just like you own the content on your own. So while generating Facebook likes, Instagram Followers, and Twitter Followers is great – it shouldn’t keep you from building your own user base through your website as well- via something like an email list or even allowing them to become members of your own website (WordPress has this capability built-in). This way, you can guarantee that your own brand won’t get wiped-out with the next change to Facebook’s algorithm or Instagram’s new privacy terms and conditions. I know many bands who built huge followings on MySpace (if you can remember back that far) – only to lose that following when the website died out. Had they been promoting their website alongside their social media the whole time, they wouldn’t have taken as hard of a hit when change came. And if there’s one thing we know to be true about the internet, it’s that it is constantly changing. Will Facebook die out soon? It’s unlikely, but having a strong website presence is a great way to ensure you remain captain of your online ship.
Again, none of these reasons should prevent you from using Social Media and posting often! Social Media is a really powerful tool to generate interest in your company/brand. But having a website to go along with it gives you something solid to link to from Social Media – and puts the control back into your hands – allowing you to craft content that fits YOU – rather than just content that fits a social media website. It’s your way of telling people that you’re in this thing for the long haul – not just another “here today, gone tomorrow” company.
There are a ton more reasons why having your own website is still important today – like e-commerce and being able to control your own online store. Do you have something to add? Let us know in the comments! We love reading your ideas.

Backup your Customizer with a click!

Our newest free WordPress plugin lets you backup your WordPress customizer with a single click! You can even download your backups so you can take them with you to other websites or back them up safely on your own hardrive 🙂


MP-Customizer-Backups

Why backup the Customizer?

The main reason to backup your customizer is because it can be fun to play with the customizer to try out new page designs and colour schemes. But what if you make a mistake and want to quickly revert to a previous setting? Now it’s super easy to do.

You can also develop locally – or on a “staging” website, export the backup, and then import it on your live site. This is a super simple and quick way to move your customizer settings from one website to another.

Check it out here:
https://wordpress.org/plugins/mp-customizer-backups/

Moving from Weebly to WordPress

I talk to a lot of people who have built their websites on services like Weebly.com and have outgrown the possibilities with the website system there. Don’t get me wrong – weebly.com is a great starting point for your website – but chances are, if you are serious about growing your website, you will quickly outgrow the limitations that website services like Weebly put on your website.

It is at the point where someone’s website starts growing that they start looking into WordPress – because of it’s amazingly huge extendability. With the use of plugins, your website’s potential increases thousands-fold. You can now install things like SocialGrids which pull all of your latest feeds from Social Media, put Email sign-ups anywhere on your website, use great services like Optin Monster to grow your mailing list, and TONS of other things I could rant on-and-on about but won’t for the purpose of keeping this blog short.

Bottom line: WordPress increases your website potential by leaps and bounds over a service like Weebly.com

Today I was helping a music artist move from weebly.com to bluehost.com so they could set up a WordPress-based website. There is one major “gotcha” that I want to point out to people moving from weebly to help prevent them from making a mistake I just made – causing the artist’s email to go down for over 6 hours – and put me on the phone for almost all 6 of those hours.

TIP: Update your email before you move the domain.

If you use Weebly, chances are you use Google Apps for your email service. Unfortunately, Weebly seems to wipe your email settings from the domain (MX Records for the geeks out there) before transferring the domain. Because domain transfers can take up to 7 days to fully go through – YOU COULD BE WITHOUT EMAIL FOR 7 DAYS! Fortunately in this case it was only 6 hours – but it’s still a stressful period when important emails are being missed.

When you log into Weebly to unlock your domain so it can be moved, make sure to set your MX records manually BEFORE you initiate the transfer. You do that by doing the following:

  1. Log into weebly.com
  2. Click on “Domain” from the top navigation
  3. Click the “Manage” button the right hand side beside your domain
  4. Click on the “DNS and Name Servers” tab
  5. Under “MX Records (email)” click “Edit”.
  6. Add in your MX Records so they look like this (using Google Apps information)

Screen Shot 2015-04-08 at 1.26.07 PM

This will help to prevent you from losing your email during the transition period as your emails will continue to be routed properly. I hope this helps to reduce some of the stress for you if you are moving your domain from one service to another.

For moving your data (text and images etc) from Weebly, we recommend that you back them up into a text file and onto your hardrive. Weebly’s migration systems aren’t very well executed and with a manual backup of all your text and images, you can be sure you won’t lose anything. Then, you can re-enter it all into WordPress once you have it set up on your new webhost.

We <3 WordPress

We love seeing people using WordPress because it is truly the best system out there for Websites today. If you need a recommendation for a webhost and you are a small company, I would recommend BlueHost, Host Gator, or Dreamhost. (Note: these are not a sponsored links and we aren’t affiliated with any of these companies so we can’t guarantee a great experience all the time – this is merely pointing in a decent hosting direction). If you are a growing company and looking for a good webhost, I highly recommend looking into Digital Ocean – both for the price and the amazing, rock solid servers. We are hosting this website on Digital Ocean’s servers and it has been great. However, there is a bit of a learning curve so I only recommend it if you have some server experience.

Animation for MP Stacks!

We just released a really exciting new Add-On plugin for MP Stacks (our page-building WordPress plugin) which allows you to animate almost anything on the page! You can separately animate both content-types, no matter what that Content-Type it is. It could be text, a video, a contact form, or even a PostGrid – you can make it animate-in in any way you can imagine.

Because it uses Keyframes, there is virtually no limit to the ways you can animate content in and out. Check it out here if you’d like to spruce up your MP Stacks with some custom animations.

Added “Works” page to Launchstack Theme Bundle

We just pushed out version 1.0.0.3 of the Launchstack Theme Bundle which now includes a “Works” page – perfect for showcasing any recent project you/yourcompany have completed. It’s great for video professionals wanting to showcase their work in a classy/unique way. Check out the new layout here:

works-page


In order to get that nice “Play” button overlay on the video thumbnails, check out this article:
How to make Launchstack Video Buttons


Want to checkout the Launchstack Theme Bundle? Click here!

Tip for Productivity

When you work for yourself, it can be hard to force yourself to stay on task and stay as productive as you’d like to be. One thing I’ve found to be really useful in keeping me focused is my to-do list.

updogI often get distracted by new and shiny things – much like the dog from “UP”…SQUIRREL! I believe that if I were born today I’d be on ritalin for sure (thank goodness I dodged that bullet!). Without going too far off topic, I really view this attention-deficit-type way of thinking as a positive thing – if I can harness it properly.

But unharnessed, I often find that while I’m waiting for a page to load, file to backup, or program to open (which can be fractions of a second), I’ve already wandered off to Twitter or Facebook to “kill time” while I’m waiting. By the time the page loads, I can find it hard to remember exactly what I was working on when I started, and I end up losing 5 minutes instead of just the 10 seconds it took to load a page.

Bring in the To-Do list! My to-do list gives me something to glance at, remind myself what I am working on, and re-focus quickly. I use this technique hundreds of times per day so it has to be quick in order to be effective.

Separate To-Do Lists:

As I touched on before, I have a mind that likes to wander and can be very imaginative – which is a double-edged sword. It gives me tons of inspiration to work on for new ideas and code inventions but I can also and up wasting a lot of time just sitting and thinking. One way I’ve found to take advantage of these thoughts, but not let them kill my productivity on current projects, is to create a SEPARATE to-do list for the long term and the short term.

I call the long term one my “Long Term To-Do List” (creative, I know). This is for ideas I know will take a lot of time and need to be thought out more clearly before starting them.

My short term list is called my “Immediate To Do” list and it gets updated dozens of times per day as I accomplish different micro tasks.

This way, I have a place to put my “Big Idea” thoughts AND a place to put the things I really need to accomplish TODAY.

I have been using Evernote for my To-Do lists lately – which is great because it syncs to my iPhone – which allows me to be anywhere when I come up with a “Big Idea” and write it on my iPhone quickly – and when I get back to my desk I can re-format the text more clearly and have it ready when I need it. Evernote also sits conveniently in my dock at the bottom of my screen so I can “flip” to it hundreds of times per day to help me re-focus after getting distracted.

Having a place to put my tasks and ideas has really helped me to be more productive, capitalize on many ideas, and even sleep better at night!

I hope these little tips can help you to stay productive as well – especially if you have a mind that wanders like I do.

Thoughts on web content width.

I remember going to see “The Matrix” right when it came out. It was directly after my high school graduating ceremony and so we were running late. We finished up our graduation and raced over to the movie theatre. Unfortunately, you know what happens if you try to go to a movie late – you’re stuck in the very front row, off to the side, craning your neck from side to side of the screen just to see everything. It was pretty overwhelming and a bit nauseating – and I told myself that I would never come to a movie late again.

front-row-sucks-moviesWhat does this have to do with the content width on your website? Well, I have been seeing a trend in some websites where the content (text and images mainly) is wider than 1200 pixels in desktop view (we’re not talking about mobile phones here) – so wide, in fact, it touches all edges of the screen. I suspect this is because designers often have very large screens and so they design to make it look good on those screens – and let “responsive”-ness fix it up for any smaller screens.

Unfortunately, on my MacBookPro 15″, it means that the title of a section is scrolled out-of-view while I’m reading it’s subtext. This makes it very difficult for me to keep what I am looking at in context and I start to feel lost on the page – the same feeling I got at the movie theatre sitting in the very front row and off to the side.

Section titles are our “bearings” when we are reading a page – and as often as we can, it helps to keep those bearings in-view. Basically, a section of your page, (or “Brick” as we like to call it) should be able to entirely fit on an average laptop screen from top to bottom. (This is also one of the drawbacks of “responsive” web design – but that’s a topic for another blog).

By making our content extremely wide and large, it feels a little bit like going to the movies and sitting right in the front row. When you are designing your pages (maybe you’re using our free page building plugin “MP Stacks” to do so), make sure to test it on all screen sizes – and try to keep your page sections small enough that you don’t make your users feel like they are at the front row of the movie theatre.

Multiple Widgetized Areas Per Page

We just pushed out version 1.0.0.4 of the free Widgets Add-On for our MP Stacks plugin (also free).

This release addresses a bug which prevented you from having multiple widgetized bricks per page. Now you can have as many widgetized bricks as you need – so get as crazy as you need to with widgets!

Note: If you already have some widgetized bricks, just open the Brick Editor for that brick (by double clicking anywhere on the brick). This will “refresh” the brick and make your widgets appear again.

If you have any feedback to give or feature requests, make sure to let us know!

Check out the MP Stacks + Widgets Addon here.

Offline Meets eCommerce?

We do a lot of work here at Mint Plugins to make eCommerce solutions for WordPress seamless and easy to use. But yesterday I was talking to an artist who is selling offline (face to face) using Square to sell their painting at Art Shows around their city. I was absolutely blown away at how great the process is using Square (note this isn’t a sponsored post).

They have considered everything from invoicing customers through email/text, to invoicing customers if they pay you in cash – which helps to keep your books and everything in one place.

If you sell products offline (in person), Square is an amazing option that allows you to swipe people’s credit cards using your Smart Phone. It doesn’t have a monthly fee – they just take a small cut of each purchase – like ANY credit card processor does.

If you sell on your website, unfortunately, Square doesn’t have an API at this point that we can use to truly keep all of our books and invoices in-sync across all platforms. I’m really hoping they open an API at some point though because it is super super slick. Check it out if you’re selling anything offline!

Changing your scenery is key!

If you’re anything like me, you spend a lot of time at your desk quietly working away and you’re pretty happy doing it. I wouldn’t say I’m an introvert. I’m more of a half-and-half type of person. I like to be outgoing and meet new people – but when I’m working, I’d rather just be left alone in my own little hole to get stuff done and tinker away on my next invention.

But come February you might find yourself experiencing a case of the blah’s and find yourself doing more fidgeting than figuring-out stuff. So how do I go about staying on task to make sure I get stuff done?

Change up your scenery. What do I mean by this? Well, while your desk and your chair are pretty awesome, and they’ll always be your go-to place, sometimes changing it up a bit is all it takes to help you settle back into a work-flow.

I know a lot of people are starting to use standing-desks, which is great, BUT you’re still chained to your desk (if its one of those desks that raises up and down). Also, be careful not to stand for too long (read more about that here).

What I’m talking about is something a little different. Take a few hours and set up standing at your kitchen counter

My piano-stand, portable desk.

My piano-stand, portable desk.

(when nobody’s using it of course…food, drinks, and laptops don’t mix very well). Or maybe set up on the couch for an hour until you feel ready to get back to your desk. I like to make workstations out of anything I have around at the time. It could be a stack of boxes beside a big window, or a piano stand with a board on top that I can move anywhere in my house!

After a few hours of a changed up environment, my brain is working better, my posture improves, and my work is getting done. Bottom line: Changing up my workspace constantly has improved my workflow – and maybe it can for you too! Give it a try.

Our Latest Theme Bundle

Tech App Theme Bundle

Join our Mailinglist

To get updates about new plugins/themes and more

Find us on Facebook

Our Premium Quality Guarantee.

We stand behind our products and if you find you aren't able to use anything you purchase from Mint Plugins as advertised, and after contacting our support desk we can't get it fixed-up for you within 30 days of your purchase, we will gladly give your money back.