How to migrate your WordPress’s staging website to your live site

A common and good practice is to build your website in a “staging” location. This allows you to get everything customized the way you need before “going live” with your website.  This is especially helpful if you’re replacing an old website, and you don’t want any downtime. You can completely build your new website in the staging location, and when you’re ready, move that to your actual “live” website.

But actually handling that migration from the “staging” site to the “live” site is a complex thing to do. Some webhosts, like Flywheel, give you the tools to do a 1-click migration from your staging site to your live site.

But most web hosts do not have an option like this yet.

There are a few WordPress plugins out there that aim to make migration easier. For reference here are a couple of those plugins:

Migration options if you’re struggling

While the above plugins are great and typically work well, we’ve also heard from quite a few customers who struggle to use these migration plugins successfully, as they can be complex. So if that’s you, we’d like to give you a few options:

  1. Use a staging service like BlogVault. This is undoubtedly the easiest option, as it’s a one-click operation.
  2. Follow our step-by-step guide using WP Migrate DB to do it yourself (below).
  3. Our team is available for hire if you’d like us to handle it for you. Contact us.

1. Using a Staging Service

Like I mentioned, handling staging and migration is not a simple thing. If this is something you’ve been struggling with for a while and just want to get it done with no more headaches, I would highly recommend taking a look at BlogVault’s staging service.

With it, you can clone your entire site with 1 click, instantly creating an exact replica staging site on BlogVault’s servers. Once you’re sure your staging site is good to go, you can push the entire staging site back to your live site with, again, a single click.

This is truly the headache-free option, and having used it myself for some projects, I have to say that it is pretty impressive. But like most things that get rid of headaches, there’s an added cost, starting at $89 per year. So you’ll have to decide whether that cost is worth the time you’re saving. It’s also worth factoring in the fact that BlogVault can also act as a backup for your site, and they also have a malware protection system if you use their PLUS plan.

While it’s not for everyone’s budget, I just wanted to make sure you were aware of that option before we dive into the steps to do it all yourself manually.

2. Do-It-Yourself Migration

The very first thing to do before migrating is to back everything up. This way, if anything goes wrong during the migration, you won’t lose any of your hard work.

There are two extremely important things that need to be backed-up and then moved properly when migrating from a staging site to a live site:

  • The site’s files
  • The site’s database

What you need before starting:

  • FTP access from your webhost, and an FTP program like Filezilla
  • Access to your database through something like PHPMyAdmin, which is typically found in your web-hosting account

Step 1. Backing up the files

With WordPress, all of your unique files are stored in the “wp-content” directory. Using your FTP program, log in using the information for FTP provided to you by your webhost.

Once you are logged in, browse to the “root” directory of your live site’s WordPress. This is the directory which contains the “wp-content”, “wp-admin”, and “wp-includes” directories, as well as a few other files created by WordPress. Typically this is found in the “public_html” directory.

Then, download your entire wp-content directory to your local hard-drive to back it up. This can take a some time if you have uploaded large files, or if your internet connection is slower. While that is downloading, you can go and make a backup of your database.

Note that you must backup both the staging wp-content directory and the live wp-content directory to make sure you have no data loss. So repeat these backing-up instructions for your staging site as well.

Step 2. Backing up the database

Anything that isn’t a file, like text you’ve saved in a post or text area, is saved to the “database”. This is the second part that needs to be backed up and moved. Typically your webhost will give you access to your database using something like PHPMyAdmin. If your hosting account has cPanel, it may even give you the option to download the database directly.

Now, you’ll need to download a backup of both your live site’s database, and your staging site’s database, to ensure you have a full backup and won’t lose any of your data.

In PHPMyAdmin (or if you’re using a different program like Sequel Pro), locate the database for your live site. Then, select all of the tables and use the menu options to export them.

Repeat this for your staging site as well to back it up.

Step 3. Migrating the files

Once you have completed the backup of the “wp-content” directory, it’s time to move it. If you haven’t completed all of the backup steps above, make sure you do those first. Otherwise you could have major data loss that is not able to be fixed.

Browse to your live site’s root directory again (the one that contains the “wp-content”, “wp-admin”, and “wp-includes” directories), and replace the entire live site’s wp-content directory with your staging site’s wp-content directory, which you’ve downloaded at the second part of Step 1 (above). You’ll want to be very careful here to make sure you are moving from the staging site to the live site, and not the other way around.

You’ll do this in your FTP program again by dragging and dropping the staging site’s wp-content directory into the root directory of the live site.

Step 4. Migrating the Database

One of the main problems that needs to be solved is properly replacing your staging domain name wth your live domain name everywhere it exists in your database. Typically this could exist in several hundred places. For example, if you uploaded a photo, it will be linked in the HTML using the staging domain. So the link to the photo might be “www.staging.mywebsite.com/wp-content/uploads/photo.jpg”. But after you migrate, you need it to be “www.mywebsite.com/wp-content/uploads/photo.jpg”.

Obviously going through and replacing each of those manually could take hours, if not days, and you’re likely to miss one or two, which can be very frustrating. But the free version of the WP Migrate DB plugin does all of that for you flawlessly. You simply use its “Find and Replace” functionality to replace any instances of your staging domain with your live domain. It is extremely smart in the ways that it does finding and replacing, and finds things that most other migration plugins miss.

Once you’ve completed the find and replace, to replace your staging domain with your live domain, download the database it gives you.

Then using your PHPMyAdmin, SequelPro, or some other way you are able to access your database, replace the tables on your live database with the tables you downloaded here from WP Migrate DB.

And that’s it!

Migrating a staging website to a live website is definitely a complex thing that requires a lot of carefulness and attention to detail, as well as a commitment to properly backing everything up. It also requires a pretty clear understanding of database tables and FTP (File Transfer Protocol). But with a commitment to those things, you can make it happen.

If you’d rather hire someone to handle all of that for you, reach out to us and we can make it happen for you.

Are your WordPress emails not sending?

WordPress <3s Email.

WordPress likes to send emails. Forgot your password? It sends you an email so you can re-set it. Got a new comment on your blog? WordPress sends an email. Use a form plugin to get emails? Those are sent by WordPress’s email system as well. It’s important that these emails actually “make it” to the people that need them.

Why WordPress Emails don’t always “make it” to their destination:

WordPress sends its emails using the server it is hosted on. With shared webhosts (which most websites use), you share a server with thousands of other websites. Hosting companies do this to save money and pass the savings on to you.

This is where the problem starts: if there was EVER a spammer who hosted a website on the same server as you, that makes email spam checkers think YOU are a spammer too – because you share the same server IP. This means that your legitimate emails end up getting flagged for spam – and either go to the “spam” folder – or don’t get delivered at all!

Solution: Email Routing.

The solution to this problem is to send your emails through a different server. A few companies provide this as a service.

Fortunately for small online businesses, there’s a great company called “SendGrid” which has a free tier. And they aren’t just anybody. Their service sends emails for everyone from Uber to Spotify and AirBnB. They are very legitimate.

There is a SendGrid WordPress plugin already built to handle sending all your WordPress emails through SendGrid.

One thing to note is that you can’t start using your SendGrid account right away – so if you are planning to switch to SendGrid, it’s a good idea to sign up early. They will review you and your website to make sure you aren’t a spammer. It’s also a good idea to make sure your website is looking/working great before you sign up for SendGrid. This makes it great for everyone! Here’s their video which breaks that down:


Setting up SendGrid with WordPress:

Once you’ve signed up for SendGrid, you can configure it with your WordPress.

Step 1. Generate SendGrid API Key:

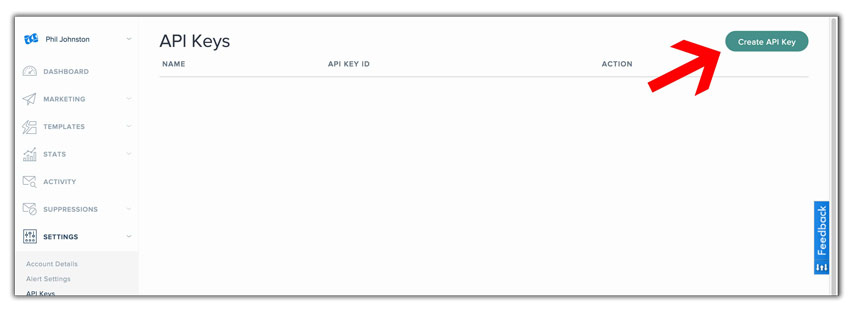
Log into your  SendGrid account and generate an API key. You can do that here:

https://app.sendgrid.com/settings/api_keys

sendgrid-wordpress-mandrill-bg

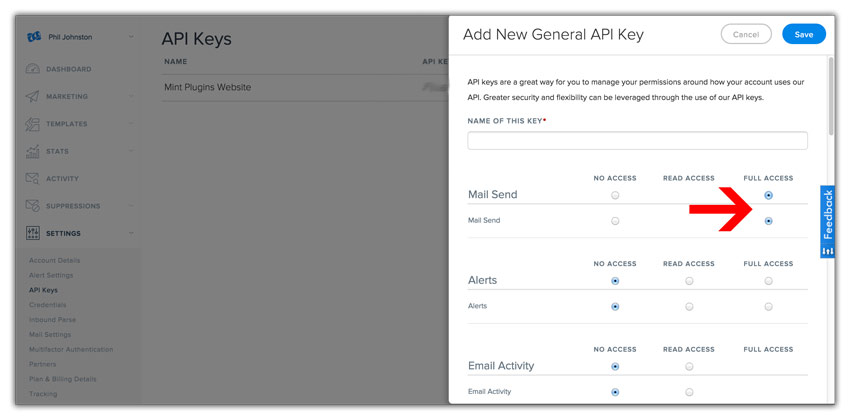
Create a “General API Key” and set it to have “Full Access” under “Mail Send”:

sendgrid-api-settings

Once you’ve saved your API Key, make sure to copy it and save it in a safe place because they’ll only show it to you once.

Step 2: Install the SendGrid WordPress Plugin.

Log into your WordPress dashboard and go to “Dashboard” > “Plugins” > “Add New” and search for “SendGrid”. You can install/activate it right there. If you can’t seem to find it that way, you can download it directly here:

https://wordpress.org/plugins/sendgrid-email-delivery-simplified/

Step 3: Enter API Key:

Once activated, go to “Dashboard” > “Settings” > “SendGrid” and paste in the API you copied in Step 1.

And that’s it!

That’s all it takes to switch your WordPress to sending emails through SendGrid. If you were previously using the wpMandrill plugin, make sure to de-activate that now so there aren’t any conflicts as well.

Got any questions? Leave us a comment below! Need to make your website more legit? Check out our Themes and Plugins which are built to do JUST THAT.

P.S. If you want to investigate other options than just SendGrid, you can check out this great post about other potential options by remkusdevries: https://remkusdevries.com/transactional-email-alternatives-for-mandrillapp/


Editors Note: We edited this post on April 4, 2019 to be refocused on SendGrid only. Previously it had a focus on switching from Mandrill, who began charging a lot of money suddenly in 2016. With most people now aware of that change, we updated this instructional article to focus on using SendGrid only.

WordPress 5.0 is coming, and Mint Plugins has you covered

WordPress 5.0 is coming on December 6, 2018 and with it comes arguably the biggest change to WordPress since its very beginning. The main blog editor has been completely changed (nicknamed “Gutenberg”), and no longer acts like a standard word processing interface. Instead, it now uses “Blocks” (which are actually very similar to our own system of “Bricks”). When writing blogs or creating pages, instead of writing content line by line and paragraph by paragraph like you’re used to, everything will be separated into Blocks. This completely changes the flow with which you write blogs.

If you’re not a blogger, this change may not affect you very much. People with content that is powered by plugins already won’t see much of a change. As for our plugins, nothing is changing at this time, and we have been working to make sure the user experience remains the same as the one you’ve learned.

Specifically MP Stacks is not changing at all. You’ll still have total control over your pages using the Brick Editor, still edit from the front-end by double-clicking on the Brick you want to change, and everything is still working perfectly on WordPress 5.0.

While the Gutenberg block-based editor has great potential, it still has quite a few problems that need to be worked out. In the WordPress community, there’s been some discussion over whether it is being rushed into WordPress core, and questions about the leadership of the WordPress open source project have arisen. There’s even been a new version of WordPress which has been “forked” in order to keep the classic editor. It is called “ClassicPress“, and if you’re concerned about either the new editor or the leadership of WordPress, migrating to ClassicPress might be an option worth considering for you.

We plan to support both WordPress and ClassicPress going forward, and are dedicated to making sure your website always works, and is easy to use.

For any of our users/customers who decide to remain on WordPress, and you’re not migrating to ClassicPress, in order to make sure we are putting you first, we have opted to disable the new editor for you until the dust settles on it. It’s going to be going through a lot of changes still, and we are watching and testing all of those changes as they happen, so that you don’t have to. Once we are confident that the new editor is stable and ready for you to use, we’ll remove our code which disables it.

If you have any questions or concerns on any of this, please let us know by emailing support@mintplugins.com, or leave a comment below. We are always here to help!

Update to our Events plugin

Hello customers and plugin users! We just released an update to our events plugin which has affected a few of you, and it should resolve the issue. The issue was kind of strange: on the 1st of each month, all of your posted events would be off by 1 month.

It was a tough issue to track and fix because it only happened 1 day each month, and by the 2nd day of the month, everything was back to normal. So we took today (November 1st) and dedicated time to make sure we squashed the issue once and for all.

The update is available in your WordPress dashboard under “Dashboard” > “Updates”. If you are having this issue you’ll be happy to know it’s been dealt with now!

As always, if you have any questions at all, let us know by emailing support@mintplugins.com, and we’ll be here to help!

Instagram does not want to be part of your website anymore

Last week, Instagram closed their open/free media API, which was the last possible way for your website to pull images from your Instagram feed onto your website. Instagram no longer approves small websites to use their API, and with this latest closure of the open/free media API endpoint, they are cutting small websites off entirely from incorporating their Instagram feeds into their site.

This affects everyone who uses our SocialGrid WordPress plugin to pull Instagram images onto their website. While Twitter and YouTube still work, unfortunately Instagram does not – and there’s really nothing we can do about it.

Why would Instagram want to do this?

While we can only guess at the actual reason here, the main answer likely relates to the fact that they can’t sell advertising unless their users are using their mobile app. Instagram wants to control the entire experience. This allows them to track users on their platform. Instagram can’t control your website, nor can they easily track your users’ behaviour, or use that tracking data to sell advertisements to them.

Instagram exists to sell advertising. It’s what pays their hosting bills, and their employees that keep the app in working order. When you pull Instagram-hosted images onto your website, it’s great for you and your website – but it’s not great for Instagram.

They can’t force you to put tracking information on your site that watches user behaviour for them. They can’t run experiments on your users to see what makes them use Instagram longer per day. They can’t sell advertisements. For them, it’s a losing situation.

But aren’t we helping Instagram by putting their images/links on our websites?

At first glance it can be confusing why Instagram would want to block this. Aren’t we sending people to Instagram by having Instagram links/images on our websites?

It’s important to remember that a huge technology company like Instagram watches everything. They not only watch every one of their users’ behaviours, clicks, and how much time they spend using Instagram per day, they also track when your website sends users to Instagram.

By making this change, we can safely assume that Instagram has realized that small websites do not send enough traffic to Instagram to make it worth their while. They don’t make these types of changes without doing a ton of research based on their user tracking. So essentially, we can safely assume that Instagram has almost nothing to gain by us putting Instagram images on our websites.

So what can we do about it?

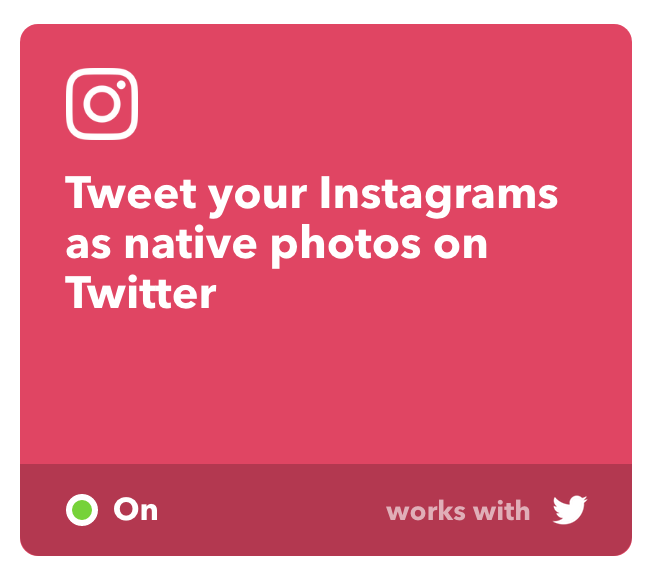
Here at Mint Plugins, we have already updated the SocialGrid plugin to remove support for Instagram. But it still does support Twitter and YouTube – both of which are constantly expanding and encouraging use of their API. So we recommend posting your content on Twitter instead of Instagram at this time. If you are used to using Instagram instead of Twitter, you can use a great service called “If This Then That” (or IFTTT for short) to automatically post your new Instagram posts onto your Twitter as native photos. You can find them over at https://ifttt.com and set up an Applet to make this happen.

Note that this will not post your old/existing photos from Instagram onto Twitter. It will only post new photos to Twitter.

If you have any questions or comments about this change, email us at support@mintplugins.com – or leave a comment below.


Why we don’t do Black Friday sales (or any sales ever).

Here at Mint Plugins we have decided to never do any sales or discounts. We want every customer to feel important and equal, and also to be confident that they are getting the best deal at all times. So, no matter when you purchase, you are always getting the best deal.


The problem with sales and deals:

When some customers get discounts and other customers don’t because they missed a sale, they feel like they got ripped off. We don’t like any of our customers to feel that way. We also make sure our products are of the highest quality and that our prices are already as low as we can make them.

How to get our best deal any day:
If you are hoping to get a deal, here’s the best one there is – and it’s available every day of the year: We sell a Master License which includes all of our plugins and themes for $110/year. If you require more than a single theme from us, this is a greatly discounted price. It is available to every customer at any time and includes unlimited installations on an unlimited number of websites.

5 Reasons NOT to start a website (and why you still should).

First off, let me say that there are MANY good reasons you should build a website. It can change your life, open new doors, help you explore your creativity, reach new audiences, help people, grow your organization’s influence/reach, create a new income source, and much much more. Building/having a website can be an incredibly positive experience and is probably something that everyone should have. However, before you start your next website, we recommend that you consider these 5 reasons not to start a website.

Based on the fact that we here at Mint Plugins are in the business of selling website tools to help you make your website amazing, it might be surprising to see a blog post titled like this one is.

The truth of the matter is that we like to see websites succeed. We don’t want to just sell you a bunch of things you don’t ultimately end up using. So we’ve created a list of the top 5 reasons you should NOT start a website. If this list doesn’t phase you, then you’re ready to build an amazing website. But if this list makes you less excited about your website, it might be a good time to think your website idea through for a bit longer and let it “bake” until you’re truly ready to go for it.

Without further ado, lets get into the list!

1. Websites take up time.

No matter how you slice it, even with WordPress (installs in 5 mins), and one of our Themes (installs in 2 minutes), making a website that is valuable takes time. While WordPress and our Themes will make it very easy for you to have an amazing looking website, what you ultimately have is a STARTING point – not the end. It’s like you’d have an amazing foundation for a beautiful house – but the house is up to you to build now. It’s like you have a book with a beautifully designed hard cover and crisp pages – but you need to write the words that go on those pages.

What does building the house look like in this analogy? It’s things like writing text/blogs, uploading photos, making videos, and creating content that is useful to your targeted audience. If it isn’t useful in some way to your audience, why would they ever want to come to your website? If your website is supposed to be educational, educate people constantly. If it’s supposed to be about comedy, make people laugh constantly.

2. You haven’t pondered who your target audience is yet.

A target audience is similar to a target in archery. Without knowing where the target is, it’s going to be very hard for you to hit it. It’s like putting on a blindfold, having your friend spin you around 50 times, and then firing off arrows hoping you’ll magically hit the target. Your chances of success are very low. That analogy might seem funny, but that’s exactly what you’d be doing if you started a website without knowing what/where your target was.

Now, it’s entirely possible that your website doesn’t need a specific target audience – or that it needs time to develop an organic audience. While rare, these websites do exist. All I’ll say is if that’s you and you don’t think you need to know who your target audience is, make sure you know WHY you don’t need a target audience. Make that decision after giving it some thought.

To help get you started on thinking about your target audience, here are a few possible examples:

– 20 -25 year olds

– 20 -25 year olds on their phones

– 75 year olds using a tablet at home

– 25 – 35 year olds on a desktop at home

– People of any age interested in your topic

The list can go on and on. Once you nail it down to a few, try combining those to further aim at your target. The more you know your target, the higher your chances of hitting bullseye. And again, your “target” could be either very narrow and defined, or very broad. Just know your target.

3. If you want to “set it and forget it”.

The internet is still like the Wild Wild West. But instead of cowboys running rampant, there are hackers waiting to take advantage of websites that people set and forget. Aside from insecure passwords, the #1 cause of hacked websites are ones that aren’t up to date. You will need to log into your WordPress at least once a month to do updates or there’s a good chance that you’ll get hacked at some point – or something will break. Make sure that when you set your website, that you don’t forget it. A good motto might be to “set it and remember it”.

WordPress makes updates amazingly easy. Simply log in at YOURDOMAINHERE.com/wp-admin, click on “Dashboard” > “Updates” and click “Update”. Do that at least once a month.

4. If you don’t want it.

This is similar to both 1 and 3 as it relates to time. However, this one is more of a moment of self reflection. There are a lot of things in life that you could do. As children we are often told we can do ANYTHING we put our minds to. However, while you can do anything you put your mind to, you can’t do EVERYTHING. There are only 24 hours in a day and unless you have money to pay employees, YOU are the one who has to put in the extra hours after your “real” job – working instead of relaxing. This is something that is easy to do at first, but after a while you can start to get burnt out. Make sure that if you are serious about a website idea that it is something you’re willing to trade in relaxation time for. Make sure you’re willing to put in those extra hours. Otherwise, you may just end up wasting money on your domain, your hosting, and your Theme as your website sits dormant while you move onto other things.

Don’t expect your website to “take off” right away. It usually takes some time for a website to start gaining traction – even if you’re dedicated to maintaining it. There are so many competing websites out there that are already getting traffic and you’re freshly breaking onto the scene. Your website will take time to start “ranking up” on Google – but if you stick at it, you will eventually get traffic. Sometimes it may not seem that way but the sites that make it are the ones that keep making valuable, fresh content and don’t quit.

Here’s the thing, not wanting to “stick with” a website doesn’t make you lazy – it likely just means you weren’t as passionate about the website as you first thought. And that’s okay – sometimes we need to pursue ideas to find out they weren’t worth pursuing. But before you dive into your next website, do yourself a favour and ask yourself some of those tough questions about how much time you are willing to dedicate to building that idea – and the other things you’ll have to say “no” to in order to make time for this “yes”.

5. You don’t want to spend any money.

The elephant in the room is that running a successful website will cost you money to start up and also to maintain. Even a new website with few visitors costs money to host every single year. While websites are relatively cheap to start up, if you are expecting it to be free, you’ll be in for a surprise when you need to spend somewhere around $100/year hosting it, $10/year for the domain, $5 for each email account using your domain name (like phil@mintplugins.com etc), and $79 for your theme.

These are simply your start-up costs. If you want to do e-commerce as well and want it to appear professional, expect to pay about $200 for plugins to make things like credit card processing work smoothly. There are definitely ways to cut down on those costs (like using Paypal Standard to accept credit card payments until you make more money – which comes free with Easy Digital Downloads – which is also free).

I’m not saying it WILL cost you all that much, but I’m saying to prepare yourself that it COULD. Every website is different any unique so your costs could be lower or higher depending on your needs.

Is it time to start your next website?

If none of the things on that list scare you – but instead they excite you, then it is probably a great time for you to roll up those sleeves and get started. You probably have a really successful website idea on your hands and the required gumption and passion to make it happen.

However, if any of those things is something you didn’t expect to hear, I recommend giving your website idea some thought. If you have any questions, leave a comment and lets have a discussion about it!

We are on your side and we want your website to be successful. Thanks for reading this honest/blunt article and here’s to building truly successful websites!

New MP Stacks integration with Yoast SEO

The latest version of MP Stacks has just been released which adds automatic integration with the Yoast SEO plugin. If you aren’t familiar with Yoast SEO, it’s a great tool for helping to make sure your website is optimized for Search Engines. It adds things like meta descriptions to your pages which search engines like to see and use for certain things.

If your page is powered using MP Stacks, your data stored in the Stack is now filtered through Yoast SEO properly so that your page’s description is generated accurately. You can also use Yoast SEO to over-ride your page’s description entirely and make it customized.

We recommend using the Yoast SEO plugin to help boost your site’s optimization for search engines. You can find that plugin here: https://en-ca.wordpress.org/plugins/wordpress-seo/

If you already use and love MP Stacks, you can also get the latest version from your WordPress dashboard under “Dashboard” > “Updates”. If you haven’t used MP Stacks yet, go check it out and get the latest version here:
https://mintplugins.com/mp-stacks/

Google Maps now requires API keys

This blog is a quick notice to anyone who is using our Google Maps plugins. As of June 2016, Google Maps now requires everyone to get an API key in order to display a map on their website. Unfortunately, this is beyond our control. Fortunately the fix is quick and free.

We just pushed out an update to our Google Maps plugin which will allow for API keys to be entered for Google Maps and has instructions for how to get it. You can find that in your WordPress dashboard under “Dashboard” > “Updates”. Then, after updating, edit the Brick containing the map to follow the steps.

In case you have trouble locating those steps, I will put them here for you to follow as well:

  1. Click here and then click on “Create Project”. Call it anything you like.
  2. Once you’ve created the “Project”, look for the list of links under “Google Maps APIs”.
  3. Click on “Google Maps JavaScript API” and then click “Enable”.
  4. Click “Go to Credentials” – or, on the left sidebar, click “Credentials”.
  5. Under “Where will you be calling the API from?” select “Web Browser”.
  6. You’ll now be on “Step 2”. Under “Name” anything you like – possibly the name of your website.
  7. Under “Accept requests from these HTTP referrers (web sites)” enter your website’s exact URL
  8. Click “Create API Key”.
  9. Copy the string of text listed beside “API KEY” and paste it below.
  10. That’s it! The rest of the heavy-lifting is done by the MP Stacks + GoogleMaps Add-On.

If you have any trouble at all, send us an email and we’ll be happy to help! Our email is support@mintplugins.com and our support team will get back to you as soon as possible – usually within 1 day (usually much quicker depending on how busy we are).

If you’d like to read more about Google’s new API requirements, you can read them here:

https://developers.google.com/maps/pricing-and-plans/standard-plan-2016-update

The #1 cause of slow websites (and how to fix it)

Take a guess at one of the #1 causes of a slow WordPress website:

  • Having a lot of WordPress plugins?
    No. This is typically misinformation. Having a lot of plugins will NOT slow your site down unless they are poorly coded. 
  • Having a lot of pages or content?
    No. WordPress is built to have tons and tons of pages and that will not cause your website to be slow. 
  • Uploading uncompressed images straight from your camera.
    YES. This is easily one of the #1 causes of slow websites.

Having images that are larger than they need to be will bring website’s loading time to a halt. While our page builder (MP Stacks) makes it extremely simple for you to use your own photos on your website, that doesn’t mean you should simply take photos directly off your camera and upload them. Properly compressing your images can speed up your website dramatically and is definitely something you need to be doing in order to make your website successful. It’s also very simple to do.

To put this in perspective, let’s take a look at an average mobile phone data plan. Say the data plan is for 1000MB/month (or 1GB). If an uncompressed, straight-off-your-camera image you upload to MP Stacks is 7MB, and then say you have 10 images that size on your homepage, it’s going to use 70MB on 1 page load. That means that person with a 1GB dataplan can only go to your page 14 times before you’ve used up their ENTIRE monthly data plan.

To make matters worse, 70MB will take at least 5 minutes to load on some mobile phones. It is highly unlikely that anyone would stay on your website that long. They will simply move on to another site.

However, by compressing your images properly before you upload them, you can bypass all of this trouble and set yourself up for success.

Convinced? Let’s compress your images!

Reducing image dimensions:

A picture you take with any average 12 megapixel camera  is going to be 4000px by 3000px. I typically don’t recommend having a width larger than 2500 for web. My tool of choice for reducing the size of images is Adobe Photoshop. When saving the image, you can set the width/height of the image. Typically for web, set it no larger than 2500.

If you don’t have Photoshop, there are a lot of free options for reducing image dimensions available. Here is a great place to start with that: https://www.google.ca/webhp#q=online%20image%20resizer

Reducing Image Quality:

Reducing the width/height of your image is only part of the story. You also need to reduce the quality to really get the filesize reduced. Ideally, we want the filesize of a single image to never be any larger than 500kb. If you are using Photoshop, when you are saving an image, there is a “quality” option. With JPG images, you can typically reduce the quality to 50% without a hugely noticeable difference. Try and make sure the final saved image is no larger than 500kb. If you can go lower without the image looking bad, go for it! The smaller the better – the faster it will load for your website’s visitors.

If you don’t have Photoshop, there are some great alternatives out there for reducing image quality/filesize without a huge change in actual visual quality. I recommend trying one of these free tools for shrinking image filesizes:

Once you’ve compressed your image, then it is time to upload it to WordPress/MP Stacks. Generally, you never want to upload an image that is bigger than 500kb. If you can do that, you’ll be well on your way to having an optimized website that loads very quickly.


How To Duplicate, Export/Import/Backup, or Copy Bricks in MP Stacks

One of our most requested features for MP Stacks (our page building/designing plugin for WordPress) is to be able to duplicate or copy/paste “Bricks” so that all the design elements can be easily reused. Essentially, any of your existing Bricks can be used as a starting point for a new Brick and save yourself a lot of time.

For example, you might build your page header using a single “Brick” and set the background image, text colors, placements and sizes of all elements, and then want to use that same header on  a different page but just change up a couple of small settings – like maybe change the header text.

It’s kind of hidden, but MP Stacks has a built-in system for copying/pasting “Bricks” so they can be re-used. It’s pretty simple to use.

  1. Open the Brick Editor for the Brick you wish to Copy/Duplicate
  2. Go to the bottom right and look for the icon of a square with an arrow and click on it.
    brick-duplicate-icon
  3. In the dialog that pops-up, click “Export this Brick” and a file will download.
  4. Open that downloaded file with a Text Editing program and copy all text in the file.
  5. Click “Add Brick” in the place you want the new Brick to be on your Website.
  6. Now in the Brick editor for your new Brick, give your new Brick a name at the top of the Brick Editor so you can identify it later.
  7. Next, scroll down to the bottom right again and click on the icon with the square and the arrow.
  8. This time, in the pop-up dialog, click “Import a Brick”.
  9. Paste in the code you copied in step 4 and click “Overwrite Brick”.
  10. That’s it! Your brick will now be duplicated and you can make any changes you wish to make this new Brick unique.

If you have any question about any of that, leave a comment or send us an email to support@mintplugins.com and we’ll be happy to help you out!

Our Latest Theme Bundle

Tech App Theme Bundle

Join our Mailinglist

To get updates about new plugins/themes and more

Find us on Facebook

Our Premium Quality Guarantee.

We stand behind our products and if you find you aren't able to use anything you purchase from Mint Plugins as advertised, and after contacting our support desk we can't get it fixed-up for you within 30 days of your purchase, we will gladly give your money back.